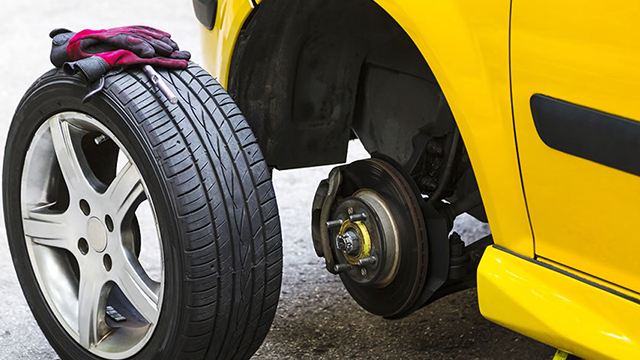

The brake disc is a device used to slow the movement of the wheel and stop the vehicle. The disk is attached to a piece called a cube or mass. Car brakes, when applied, trap the disc through the pads, creating friction that slows down the movement of the wheel, braking the car. Friction produces heating and heating decreases the effectiveness of braking. For this reason there are two types of discs: solid and ventilated, the latter offers better and faster heat removal when braking. These differences make it necessary to know exactly what type of discs that vehicle model uses when changing brake discs.
The wear of both the brake pads and the discs depends on the use that is given to the car or, in other words, on the kilometers traveled. Although the brake pads are the ones that suffer the most wear and need to be replaced periodically, the brake discs also wear out although their use lasts much longer. Every time the brake pads are changed, the discs must be checked. If the brake pads are checked and changed on time, the discs will hold up better and last longer.
In general, a car used more in the city has greater wear in terms of brake discs than a car that travels on the highway. Many vehicles have a warning light warning that the pads are worn out with some anticipation so that you have time to change them and thus take care that the brake discs do not suffer wear.
What do you need to change brake discs?
- Tools: wrenches, hammer, screwdriver, etc.
- A cat
- Brake discs same as the ones to be replaced.
Instructions for changing brake discs
- When braking due to friction between the pads and the disc, wear occurs, reducing the size of the disc and the formation of a ridge. Depending on the size of this rim and the thinning of the disc, they must be replaced, also when the discs have some detail such as cracks, warping, breaks or scratches, it is essential to change them, for this reason they must be checked periodically.
- In the manuals of each car the minimum thickness allowed for its brake discs is defined, below this value they must be changed. It is also indicated on the disc’s description sheet. Since the disc never wears evenly, it is ideal to measure the thickness in three different places: in the area near the outer edge, in the center, and in the area near the inner edge. This is done with a specific caliper type tool.
- When the pickups are very worn, the support that holds them touches the record, this causes it to scratch it and produce a very characteristic metallic sound. We should not go to this extreme because we will be forced to change the discs ahead of time.
- Other problems that can arise is that if the brake disc overheats it can warp and this is noticeable because you feel the steering wheel vibrate when you brake.
- Cracks occur when the disc is too worn and breakage when rust weakens it too much.
- Checking the brake discs should be done approximately every 20,000 km, no more.
- To change the brake discs you must first disassemble them, that is, raise the car on one side with the jack, disassemble the wheels on that side, that is, remove them from the axle. If you are going to change the discs, also change the pads, although you can change the pads and it is not necessary to do it with the discs.
- First you must remove the caliper or caliper where the brake pads are housed, loosening and removing the fixing locks. This is done with a punch or screwdriver and a hammer, remembering the position they are in when reassembling. If the brake pads have little wear, it is not necessary to change them. But if they require the change, they will proceed as follows:
- We remove the pills after having removed the anti-vibration locks. These come out easily, once extracted, with a lever we push the pistons until they are flush with the casing of the jaw. This is necessary so that after placing them in the caliper it is not necessary to apply force to the disc.
- Now we will proceed to disassemble the disc, for which we must loosen and remove the fixing screws to the mass, hitting the edges of the disc a few times.
- Now we will replace the disk that we removed with the new one, previously you must clean the mass with a steel brush so that the new disk sits perfectly. Then place and tighten the disc fixing screws.
- The new drive has to be exactly the same as the one you removed, either solid or vented.
- Finally you will have to place and adjust the caliper with the new pads (if they were replaced), place the upper fastening bolt, then the anti-vibration lock and finally the lower bolt, applying force on the lock so that it is located in its place.
- Before putting the wheel, press the brake pedal several times until you feel that it does not go all the way, which indicates that the plunger was in the correct position for braking.
- Place the wheel and repeat the operation on the other three.
Tips for changing brake discs
- Avoid having to brake suddenly, long and sudden braking deteriorates the brakes
- Respect the minimum safety distance when you are driving, this way you will always have time to brake smoothly without demanding too much from your car.
- When you change the discs, if your car has a pill wear indicator, disconnect it until you have changed them.
- On very steep and long descents, it is advisable not to brake for a long time with the brakes so that the discs do not overheat. The ideal is to help braking with the gearbox.